Professional Teeth Whitening at Home with Smile Brilliant
- Jun 5, 2019
- 3 min read


Whether you're a busy mom, college student, or just a busy bee, the one thing we all wear is our smile. It's our best accessory, but let's face it, it's usually not as sparkly and white as it could be! I am a busy mom that really enjoys her daily cup of coffee, (or two) so more often than not, I will notice my teeth are dull, and my smile is definitely not as white as it used to be. Before having Jordan, I used Crest whitening strips to whiten my teeth. I didn't even consider getting them professionally done at a dentist office because of of how time consuming and costly it is. The crest whitening strips were expensive, slimy, and made my teeth and gums so sensitive with no relief. Plus, they only partially covered my entire smile, so it was unevenly whitened. I wanted to start whitening my smile again, but wasn't jumping at that option right away, so I never did anything about it!
When Smile Brilliant contacted me to collaborate, I knew it was the answer I was looking for. Smile Brilliant covered all the things I was looking for in a whitening system; they have custom fit whitening trays, you can do everything through the mail, so no dragging babe to the dentist, and it's professional grade whitening with the desensitizing gel, so it's safe and effective for under $180. So good, right?
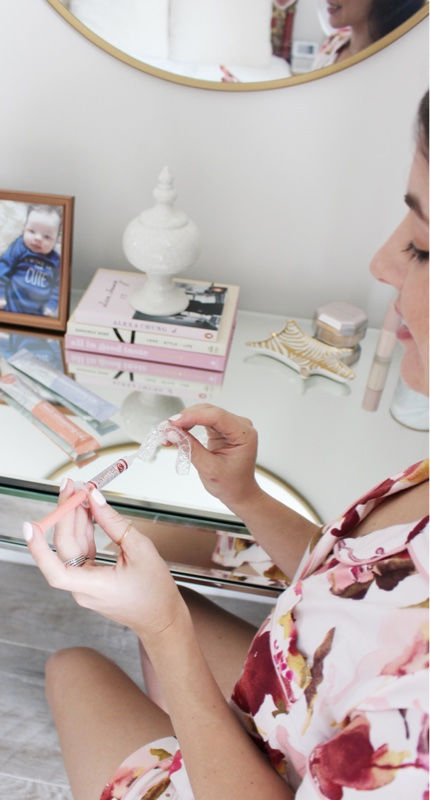
So, here how it happens. I answered a couple of questions about my dental history, then a few days later I received a kit in the mail with everything I needed for my entire whitening session. In the kit, I created a mold of my upper and lower teeth. This process only took a couple minutes to do, it wasn't messy, and once it dried, I just sent the mold back in the envelope that came with the kit.
Once I recieved my custom fit trays, I whitened my teeth every other night for two weeks. Every time I did, I noticed a huge difference! If you have sensitive teeth and gums like I do, they send you desensitizing gel that I definitely recommend. Also, here are a couple more tips that I wanted to share with you:
- brush your teeth without toothpaste first
- make sure teeth are dry before applying the trays
- you can use the desensitizing gel before and after you whiten
- only use 1/3 of the whitening gel for the top AND bottom tray PER use
- wet a q-tip and wipe off the excess gel that gets on your gums after you put the trays on
- whiten an hour or so before bed so that way you don't stain your teeth afterwards
- if you already had your coffee you can whiten while you do your hair and makeup
- you can do it every night or every other night depending on sensitivity
I was so impressed by the process and outcome with Smile Brilliant that unless I give up my daily cup of coffee, (and this mama drinks wine on the weekends ;) then I will continue to use them as my go-to whitening system! Luckily, since you don't have to use that much gel for each session, I have plenty, and just in time to keep my smile white for summa time!
If you have any questions about the product that I didn't cover, you can always ask me and I'd be more than happy to answer! Or, here is an article on 7 Things To Know Before Buying Teeth Whitening
The Smile Brilliant Whitening Process easily erased years of stains and made them less dull!

GIVEAWAY
If you would like to enter to win a FREE Smile Brilliant Whitening System then click here:
Don't want to wait? Enjoy 15% off site wide with code: thatpetitepineapple15
Thanks for reading + good luck!


Comments